Table of Contents
Introduction
The classifiers app provides most of the functionality in this API.
Specifically, it provides the following:
- A database model to easily upload trained models as HDF5 files. The model also supports uploading loss curves, calculating accuracy, obtaining classification reports, visualizing convolutional layers, etc.
- Serializers which convert complex Python datatypes to primitive ones so that it is easier to work with JSON.
- Utility functions to load datasets and obtain predictions in a nice format.
It is completely isolated from the rest of the project and so, extremely portable. For all intents and purposes, you can copy over the directory to your own Django project and use all of the functionality provided (provided you define some settings).
MLModel
The MLModel database model is the model used to work with trained MesoNet variants. It provides the ability to obtain predictions from variants and visualizing convolutional layer outputs.
Fields
-
model_iddjango.db.models.UUIDFieldAn auto-generated UUID field which acts as the primary key for the database model. It is populated automatically when a new instance is saved to the database.
-
model_namedjango.db.models.CharFieldA single line of text denoting the name that will be displayed for the variant in front-ends. It must be unique and can be a maximum of 30 characters long.
-
model_descdjango.db.models.CharFieldA single line of text denoting a short description of the variant for the user. You can use this to give a brief summary about the training process or validation accuracy. It can be a maximum of 200 characters long.
-
model_filedjango.db.models.FileFieldThe HDF5 file for the variant. If the file is not in the HDF5 format, it is likely that things will break. It saves the variant to the directory set in
MODEL_FOLDERusing a custom storage class and changes the name of the uploaded file using theget_model_filename()method. -
loss_curvedjango.db.models.ImageFieldThe loss curve of the variant. It can be in any image format. It saves the image to the directory set in
MEDIA_FOLDERand changes the name of the uploaded file using theget_loss_curve_filename()method. -
accuracydjango.db.models.FloatFieldThe accuracy of the variant. This is calculated the first time you save the variant, on the dataset available at
DATA_ROOT.It is not recalculated after every save. Therefore, if you modify an existing instance’s
model_file, it will not be updated. Thus, it is better if you always delete an instance and create a new one. -
clrdjango.db.models.JSONFieldThe ROC report of the variant. This is calculated the first time you save the variant, on the dataset available at
DATA_ROOT. It usessklearn’sclassification_report()function.The stored JSON is in the following format:
{
    "columns": ["", "precision", "recall", "f1-score", "support"],
    "rows": [
        [0, 0.90, 0.81, 0.85, 700],
        [1, 0.92, 0.83, 0.87, 700],
        ...
    ]
}
This is the usual report generated by
classification_report(), transformed into a format which makes it easier to create an HTML table. This is done through theclr_to_tabular()utility.It is not recalculated after every save. Therefore, if you modify an existing instance’s
model_file, it will not be updated. Thus, it is better if you always delete an instance and create a new one -
conv_layersdjango.db.models.JSONFieldA nested JSON array which stores information about all the convolutional layers in the variant. For each convolutional layer, an element
[NUM_FILTERS, [FILTER_SIZE, FILTER_SIZE]]is stored in the array, whereNUM_FILTERSis the number of filters (kernels) in that layer andFILTER_SIZEis the size of a filter. It is calculated when the variant is a saved for the first time.Example:
[[8, [3, 3]], [8, [5, 5], [16, [5, 5]], [16, [5, 5]]]This is useful for presenting layer information in front-ends.
It is not recalculated after every save. Therefore, if you modify an existing instance’s
model_file, it will not be updated. Thus, it is better if you always delete an instance and create a new one
Class Attributes
-
rootstrThe sub-directory in
MODEL_FOLDERwhere the HDF5 files should be uploaded.Default:
"trained_models". -
loss_rootstrThe sub-directory in
MEDIA_FOLDERwhere the loss curves should be uploaded.Default:
"loss_curves". -
plot_rootstrThe sub-directory in
MEDIA_FOLDERwhere any generated plots of convolutional layers should be saved.Default:
"plots". -
help_textsdictThe help texts for each of the fields of the database model. Having them in a dictionary leads to shorter lines in the actual field declarations.
Default:
{
      "model_name": "A user-friendly name for the model",
      "model_desc": "A short description of the model that can help the user make a decision",
      "model_file": "The HDF5 containing the model",
      "loss_curve": "The loss curve of the model",
      "accuracy": "The accuracy of the model (calculated when saved)",
      "clr": "The classification report of the model (generated when saved)",
      "conv_layers": "The # and size of filters of each convolutional layer (detected when saved)",
}
Methods
get_model_filename(filename)
Method to obtain a filename for the HDF5 file of a MesoNet variant.
The format of the filename (relative to MODEL_FOLDER) is <root>/<model_name>.<ext>, where <root> is the above mentioned class attribute and <model_name> is the model_name field of the instance in snake case. <ext> is the extension of the uploaded file. While this ensures that any extension can be uploaded, the TensorFlow API will probably break if the extension is not .hdf5 or .h5.
For example, if model_name is set to Model 1 and the default value of root is used, the generated path will be trained_models/model_1.hdf5.
| Arguments | |
|---|---|
filename | str: The original filename of the uploaded file. |
| Returns | A str with the new filename. |
get_loss_curve_filename(filename)
Method to obtain a filename for the loss curve of a MesoNet variant.
The format of the filename (relative to MEDIA_FOLDER) is <loss_root>/<model_name>_curve.<ext>, where <loss_root> is the above mentioned class attribute and <model_name> is the model_name field of the instance in snake case. <ext> is the extension of the uploaded file.
For example, if model_name is set to Model 1 and the default value of loss_root is used, the generated path will be loss_curves/model_1_curve.png.
| Arguments | |
|---|---|
filename | str: The original filename of the uploaded file. |
| Returns | A str with the new filename. |
get_loaded_model()
Method to obtain a tf.keras.Model instance from the HDF5 file of a MesoNet variant.
It uses tf.keras.models.load_model() to create a tf.keras.Model instance and returns it. To avoid loading the model multiple times for the same instance, it uses caching by setting a private attribute, _loaded_model, on the instance.
predict(data, steps=None, threshold=0.5)
Method to obtain predictions on the data provided.
This method works only if the output layer uses a sigmoid activation. It loads the model and calls the .predict() method of tf.keras.Model to obtain the sigmoid probabilities. It then classifies them into the positive (1) or the negative class (0) based on the threshold. The function is agnostic to the actual class labels.
| Arguments | |
|---|---|
data | Data on which to make predictions. See https://www.tensorflow.org/api_docs/python/tf/keras/Model#predict. |
steps | int: Total number of steps (batches of samples) before declaring the prediction round finished. Ignored with the default value of None. If data is a tf.data dataset and steps is None, predict will run until the input dataset is exhausted. |
threshold | float: Minimum probability (between 0 and 1) to classify a prediction as the positive class (1). Comparison used is >=. Defaults to 0.5. |
| Returns | A two-tuple (x, y) where:1. x is a Numpy array of dimension (NUM_IMGS, 1) containing the predicted sigmoid probabilities for each image. 2. y is a Numpy array of dimension (NUM_IMGS, 1) containing the predicted classes for each image. |
get_activation_model(conv_idx)
Method to obtain an “activation model” of a MesoNet variant.
An activation model is defined as a model which has the same input as the variant and whose output consists of the output of least one convolutional layer of the variant. Since this outputs are obtained after an activation function is applied on the convolution, hence the name.
It loads the variant, automatically detects all the convolutional layers present in it, selects the specified ones from among them and creates a new tf.keras.Model instance which has the same input(s) as the variant and the outputs of the selected convolutional layers.
When you make predictions using this model, the result will be a list with as many Numpy arrays as the number of convolutional layers selected, each array corresponding to the output of a layer.
It is useful for visualizing the convolutional layers as images.
Note: If you create an activation model with a single layer, you get a single Numpy array containing the output of that layer (not a list) when making predictions.
| Arguments | |
|---|---|
conv_idx | list-like: Indices of the convolutional layers which should be included in the output of the activation model (0-indexed). The ordering of indices is important since the outputs (after prediction) will be in the same order. |
| Returns | A tf.keras.Model instance representing the activation model. |
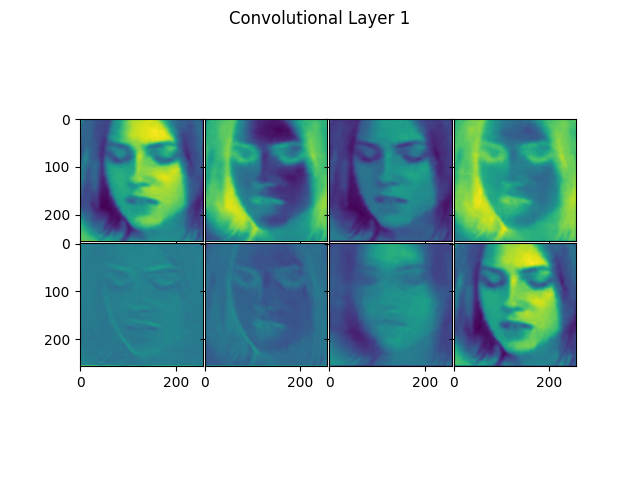
visualize_conv_layers(imgs, conv_idx)
Method to visualize specified convolutional layers of a MesoNet variant for given images.
It take a Numpy array of images and a list of indices of convolutional layers, generating plots of the outputs of the layers in the variant for each image. To do this, it uses the above mentioned get_activation_model() method.
An example plot is shown below (showing the first layer of a variant):
| Arguments | |
|---|---|
imgs | np.array: Images for which the layers are to be visualized. The dimension of the array should be (x, HEIGHT, WIDTH, CHANNELS), where x is the number of images. HEIGHT, WIDTH and CHANNELS should match the inputs for the variant. |
conv_idx | list-like: Indices of the convolutional layers to be visualized (0-indexed). The plots will be generated in the order the indices are mentioned. |
| Returns | A generator where each item is a list with URLs to the layer plots for an image. The order of the URLs is the same as the order of indices in conv_idx. |
_visualize_conv_layers_single_img(activations, conv_idx, filename_seed)
Class method to visualize output of multiple convolutional layers for a single image and save the generated plots.
It takes the outputs of the specific convolutional layers for a single image and sequentially generates the plots for each layer, saving them to plot_root. Once all plots are generated, it returns a list of URLs to the plots.
This is the method which actually generates the plots of the layers. It exists only to aide visualize_conv_layers() and you probably won’t need to use it directly.
Note: The value of
filename_seedpassed byvisualize_conv_layers()to this method isplot_img<idx>, where<idx>is the index of the image.
| Arguments | |
|---|---|
activations | list-like: Computed outputs of convolutional layers for a image. It should contain Numpy arrays. |
conv_idx | list-like: Indices of the convolutional layers to be visualized (0-indexed). The plots will be generated in the order the indices are mentioned. |
filename_seed | str: Prefix of filenames for the generated plots. |
| Returns | A list of str instances representing the URLs to each of the generated plots. |
save_plot(f, filename_seed, idx=0)
Class method to save a plot of a convolutional layer to plot_root.
This method is used by _visualize_conv_layers_single_img() to save each plot it generates. It takes the filename_seed and the index of the convolutional layer whose plot it is currently saving, and saves the plot to plot_root with the filename as <filename_seed>_conv<idx>.png. Once saved, it returns a URL of the file.
Note: Django might append an arbitrary short string at the end of the filename to make sure it is unique.
| Arguments | |
|---|---|
f | File-like: Plot file it needs to save. While it can accept any File-like object, _visualize_conv_layers_single_img() uses a BytesIO object. |
filename_seed | str: Prefix of filename for the plot. |
idx | int: Index of the convolutional layer whose plot it is saving. Defaults to 0. |
| Returns | A str representing the URL to the saved plot. |
Utilities
The utils module in classifiers provides utilities that are used by the rest of the project.
Classes
Prediction
Class to encapsulate the prediction made by a MesoNet variant for an image.
A prediction constitutes of many things: the image, a true label associated with the image, the predicted label, the probability and any plots of convolutional layers. Creating a class to encapsulate these things makes management easier and also allows for easier integration with Django.
Attributes
img_url: URL to the image whose prediction the current instance is encapsulating.true_label: True label of the image. This should, ideally, not be a1or a0but the actual class labels likerealanddf. This is not enforced.pred_label: Predicted label of the image. This should, ideally, not be a1or a0but the actual class labels likerealanddf. This is not enforced.probability: Predicted sigmoid probability. It can be a percentage or a fraction, depending on how you plan to use the prediction.plots: List of URLs to plots of any convolutional layers related to the image. If not provided in the constructor, it defaults to an empty list.
Example Usage
from classifiers.models import MLModel
import numpy as np
from tensorflow.keras.preprocessing import image

# Load the image
img = image.load_img('media/data/real/real_img.png/', target_size=(256, 256))
img = np.expand_dims(img, axis=0)

# Make prediction
model = MLModel.objects.first()
prob, pred = model.predict(img)
pred = "real" if pred[0] == 1 else "deepfake"

# Create instance
# Once you have this, you can serialize it very easily
prediction = Prediction(
    img_url='/media/data/real/real_img.png/',
    true_label='real',
    pred_label=pred,
    probability=prob[0]
)
Functions
get_data_generator(batch_size=64, shuffle=True)
Function to obtain a DirectoryIterator which yields images found in DATA_ROOT.
The images are rescaled by 255 and no other augmentations are applied.
| Arguments | |
|---|---|
batch_size | int: Size of batches of the data. |
shuffle | bool: If True, the order of images is randomly shuffled. |
| Returns | A DirectoryIterator yielding tuples of (x, y) where x is a numpy array containing a batch of images with shape (batch_size, *target_size, channels) and y is a numpy array of corresponding labels. |
select_img_batch(batch_size)
Function to obtain a randomly selected batch of images from the dataset at DATA_ROOT containing the specified number of images.
It uses get_data_generator() to obtain a generator of batches and then randomly selects one batch.
| Arguments | |
|---|---|
batch_size | int: Number of images in the batch. |
| Returns | A four-tuple (w, x, y z) where:1. w is Numpy array of dimension (batch_size, IMG_WIDTH, IMG_WIDTH, 3) containing the images in the selected batch.2. x is a list containing relative filenames of the images with respect to DATA_ROOT.3. y is a list containing the actual labels (1/0).4. z is a dict, mapping 1/0 with their actual class labels. |
get_dataset_size()
Function to obtain the number of images in the dataset at DATA_ROOT
It returns an int containing the number of images.
clr_to_tabular(clr)
Function which converts a classification report generated using sklearn into a format more suitable for making HTML tables.
It takes the classification report in a dict format and converts it into a new dict containing two keys: columns and rows. columns is a list of column headers, corresponding to the columns seen when the classification report is generated as a string. rows is a list of lists, each list corresponding to one row in the classification report.
For example, if the report is as shown below (when printed as a string):
                   precision    recall  f1-score   support

           0       0.96      0.94      0.95       773
           1       0.96      0.97      0.97      1172

    accuracy                           0.96      1945
   macro avg       0.96      0.96      0.96      1945
weighted avg       0.96      0.96      0.96      1945
Then the function will return the following dictionary:
{
  'columns': ["", "precision", "recall", "f1-score", "support"]
  'rows': [
    [0, 0.96, 0.94, 0.95, 773],
    [1, 0.96, 0.97, 0.97, 1172],
    ["accuracy", "", "", 0.96, 1945],
    ["macro_avg", 0.96, 0.96, 0.96, 1945],
    ["weighted_avg", 0.96, 0.96, 0.96, 1945]
  ]
}
| Arguments | |
|---|---|
clr | dict: Classification report as generated by sklearn. |
| Returns | A dict in the format shown above. |
get_predictions(model, num_imgs, conv_idx)
Function to obtain predictions from a MLModel instance on a randomly selected batch of images with optional visualization.
It uses select_img_batch() to obtain a random batch of images containing num_imgs number of images and creates a list of Prediction instances with predictions for each image in the batch.
| Arguments | |
|---|---|
model | MLModel instance: MesoNet variants from which predictions are to be obtained. |
num_imgs | int: Number of images for which predictions are required. |
conv_idx | list-like: Indices of convolutional layers (0-indexed) whose outputs should be visualized. Pass an empty list for no visualization. |
| Returns | A list containing a Prediction instance for each image. |
Constants
IMG_WIDTH
The size of images that should be returned by get_data_generator(). Defaults to 256. When making predictions, make sure that the number matches the input size expected by your MesoNet variant.
Serializers
MLModelSerializer
Class to serialize instances of MLModel.
It inherits from rest_framework.serializers.HyperlinkedModelSerializer. All the fields of MLModel are part of the serializer.
PredictionSerializer
Class to serialize instances of Prediction.
It inherits from rest_framework.serializers.Serializer. It has the following fields:
img_url: AURLFieldto serialize theimg_urlattribute ofPrediction.true_label: ACharFieldto serialize thetrue_labelattribute ofPrediction. It has a max length of 20.pred_label: ACharFieldto serialize thepred_labelattribute ofPrediction. It has a max length of 20.probability: AFloatFieldto serialize theprobabilityattribute ofPrediction.plots: AListFieldto serialize theplotsattribute ofPrediction. Thechildattribute of the field is set to aURLFieldsince theplotsattribute stores a list of URLs.
Example Usage:
from classifiers.models import MLModel
from classifiers.utils import get_predictions
from classifiers.serializers import PredictionSerializer
import json

# Get model
model = MLModel.objects.first()
# Make predictions on 10 images, visualizing the 1st and 4th layers.
predictions = get_predictions(model, 10, conv_idx=[0, 3])

# Serialize the predictions
serialized = PredictionSerializer(predictions, many=True)
# Get a JSON string
predictions = json.dumps(serialized)
Storages
MLModelStorage
Storage used to save the uploaded HDF5 file of a MesoNet variant to MODEL_FOLDER.